My current gig is about replacing the current workplace, based on Windows 10, on-prem Active Directory and SCCM, with a ‘Cloud Managed Workplace’: Windows 11, Entra ID Joined devices, Intune Management and autopilot deployment.
One of the main security risks in the current workplace is the vast amount of users with local administrator rights on their devices. Time to change that!
Revoking local admin rights
Revoking local admin rights isn’t that hard, technically. You just take away the rights, or don’t give new local admin rights when replacing devices. The greatest challenges comes with user behaviour and politics. Those local admin rights are there for a reason, and people seem to really get attached to having those rights. So, communication is key.
On the technical side of things, some people might still need permission to install specific software or change settings, so you’ll need to have an option for that.
Endpoint Privilege Management
To make sure that end users still have the option to perform specific tasks without those pesky local admin rights, we’ve decided to use Endpoint Privilege Management.
This functionality, as a stand-alone add-on or as part of the Intune Suite, will grant end-users the option to run specific executables with ’elevated privileges’, based on a set of rules you define. More on our approach when deploying this in a later blogpost.
For now, let’s see how we can make sure that no admin rights are left behind.
Checking for lingering admin rights
We want to make sure all devices have no additional local administrators. We want to detect existing local administrators, or detect when additional local administrators are added to the device. We took a two-way approach here: SecOps created some KQL Queries that trigger an alert when the members of the local administrators group are changed. On the Intune side however, I want to mark devices with ‘rogue’ administrators as non-compliant.
Custom Compliance Scripts
Achieving this goal can be done with Custom Compliance script in Intune. This basically gives you the option to run a PowerShell script (or other language if you’re using it for Linux endpoints) and define what the outcome should be. By using this functionality, we can mark devices non-compliant based on -for example- the number of local admins on the device.
Using PowerShell for detecting local admins
So, we will be doing some good-old PowerShelling! I’ve said it before and I’ll say it again (louder for the people in the back!): Learning PowerShell was one of the best choices in my IT career. And it comes in handy yet again!
Getting local Administrators
Let’s start with checking out how we can get the local admins on a device. For this, we will use the Get-LocalGroupMember cmdlet.
We can simply use Get-LocalGroupMember -Group Administrators to get the members of the local Administrators group. This will only work when your group is indeed called Administrators. This will be the case in most languages, but not all. Fortunately, this group will always have the same SID, so we can use that to get the group whatever the system language may be.
| |
With these two lines of PowerShell, we will get a list of all members of the local administrators group, independent of the OS language.
Filtering out allowed accounts
Of course, reducing local admins doesn’t mean no local admins. There are a few accounts that should be present on the device. There is the built-in Administrator account, there are groups with local admin rights that get pushed from Intune (for example the Global Administrators group), and you might for example use LAPS to have administrative access to devices. So, let’s make sure we don’t mark devices as non-compliant based on these accounts.
| |
The first account that will always be present, is what I call the WellKnownAdmin account: the built-in Administrator account in the OS. The name of this account can differ, based on for example the OS language. To make the script work in these scenario’s, I use the Get-LocalUser cmdlet and filter on the SID. The SID for the built-in admin account will start with S-1-5-21, followed by domain identifiers. The SID will always end with 500. Therefore, we can use the -like operator with the wildcard to filter on accounts with this SID. Want to know more about how SID’s are built? Check out MS Learn!.
The second account in our list, is the account we have specified as an administrator account for LAPS. We use a static account name here, for ease of management. This account can be used by people with the correct role assignments in Intune to gain administrator access to workstation, for example for support scenarios. In this example, I’ve named this account some-static-admin, to make sure the naming convention isn’t related to my client ;)
Both of those accounts are local to the machine, so they should be prefixed with the machine name. I use the env:COMPUTERNAME environment variable to generate the exact name of these accounts, indepent from the device.
The last two accounts, are groups in Entra ID. By default the Global Administrator and Microsoft Entra Joined Device Local Administrator groups in Entra ID are added to the local Admninistrators group on Entra ID Joined devices. This way, members of these groups can have local admin rights on Entra ID joined devices for administrative purposes.
To correctly add these groups to our allowed list, we’ll need the SID for these groups. The easy way is to get your hands on an Entra ID joined device and just run the Get-LocalGroupMember -Group Administrators cmdlet and get the accounts from that list. If you don’t have access to such a device, you can get the Group Object ID from Entra and convert that to what the SID will be. Oliver Kieselbach has some PowerShell to help you do that. In my example, I have obfuscated the SID’s for obvious reasons.
Creating the list
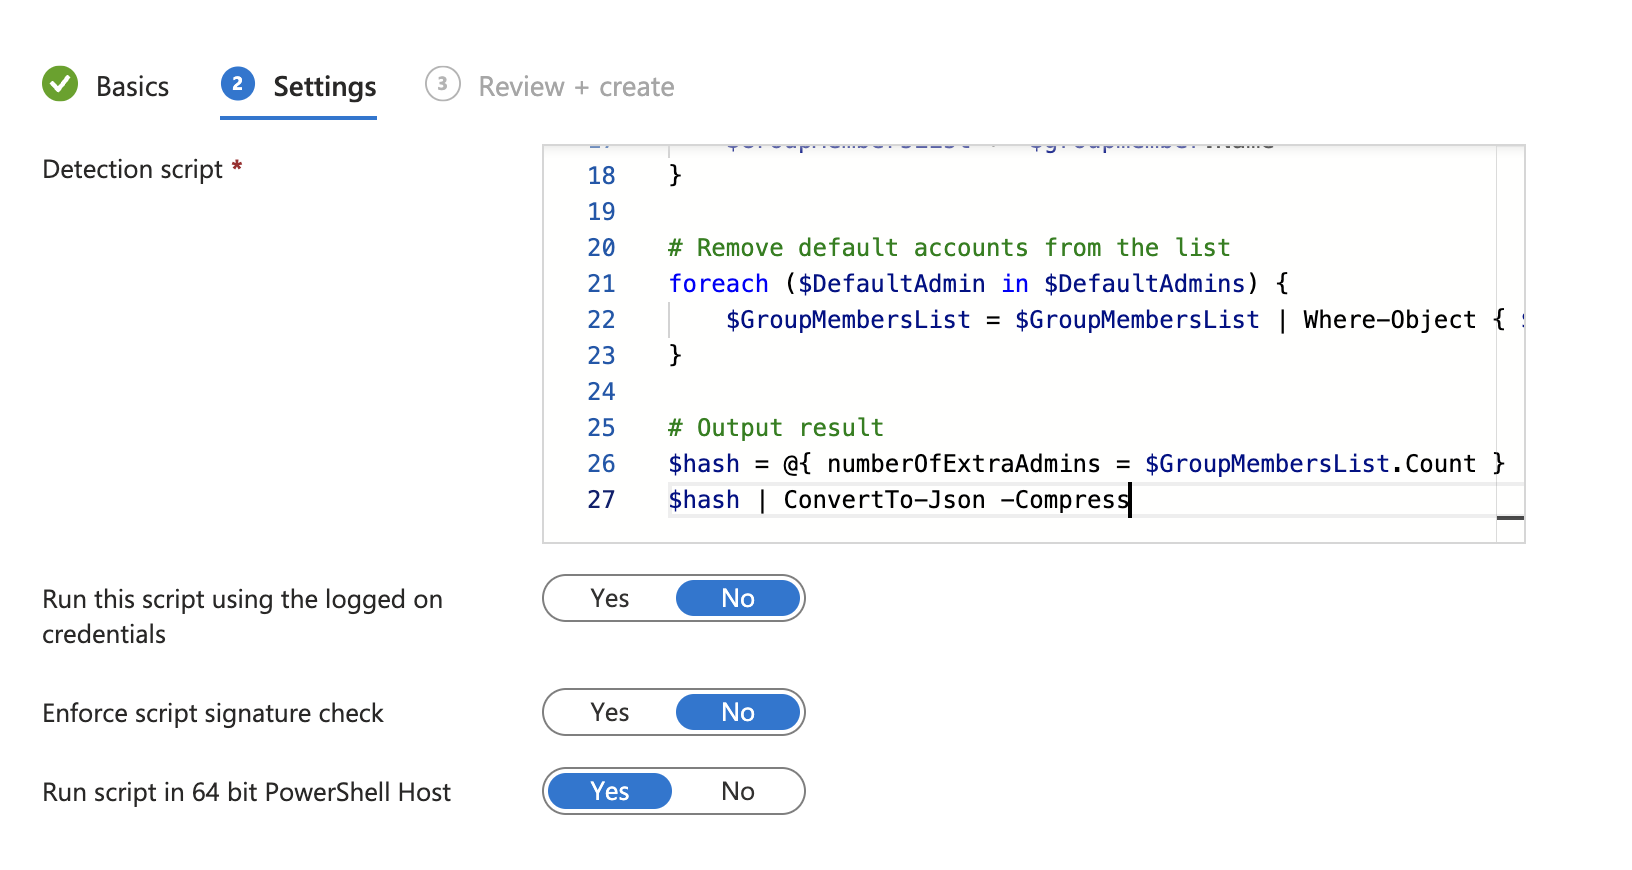
Now, we can combine the logic of these two parts: generate a list of existing admins and removing the allowed accounts from that list.
| |
This will end us up with a list of accounts that are a member of the local Administrators group, but are not on our list of approved accounts. These accounts will be in the $GroupMembersList variable that we can use to create our definitive output. If all is well, this variable should be empty: no admin accounts that are not approved. If there are accounts on this list, this is a reason to mark the device as non-compliant.
If you simply run this script in PowerShell on your device, you will see the output it generates. But to use this script in a custom compliance policy, we need the script to output a JSON object that we can compare to a ‘known good’ state. So, we create hashtable with a key of numberOfExtraAdmins and a value of the actual… Well… Number of extra admins ;) We can then output this hashtable in JSON formatting.
| |
Matching the outcome of your script to the baseline
So, we now know we have a script that should output a JSON object with a numberOfExtraAdminof 0 to be compliant. Any other value should mark the device as non-compliant. To set up the custom compliance policy, we need to define the expected outcome in a JSON-file.
| |
The file speaks for itself: we define that Settingname: "numberOfExtraAdmins should Operator: IsEquals the value of Operand: "0". We also define an optional MoreInfoUrl and the RemdiationStrings. You can define multiple languages here if you like, but for this example I’ll stick with English.
We’ll save this file as admins.json (or whatever you’d like to call it) so we can use it in the Intune portal for configuring the custom compliance policy.
Configuration in the portal
Adding the custom compliance settings to our tenant is a two-step process. First, we need to define the script. Then, we’ll define the policy with the expected outcome.
Adding the script
Now, let’s set up our new script through the Intune Portal. Navigate to Endpoint security > Device compliance > Scripts > Add. You can add your script from here.
After setting some basic information, like the name and the author, we can paste the content of our script and set the run settings.
Now that we have the script set, we can define the policy.
Defining the policy
Using our custom script in a compliance policy, is basically just a matter of creating a compliance policy like you would regularly do. Once you’ve set up the basics, you configure the settings under ‘Custom Compliance’.
Under ‘select your discovery script’, you can select the script you uploaded in the previous step.
Below that, you upload your admins.json file and the information will automatically be populated.

After that, you configure your policy, like the assignments, scope tags, etc., just like you would normally do.
That’s it! Grab yourself a beer, you’ve just created your custom compliance policy to check for rogue administrators on your endpoints.
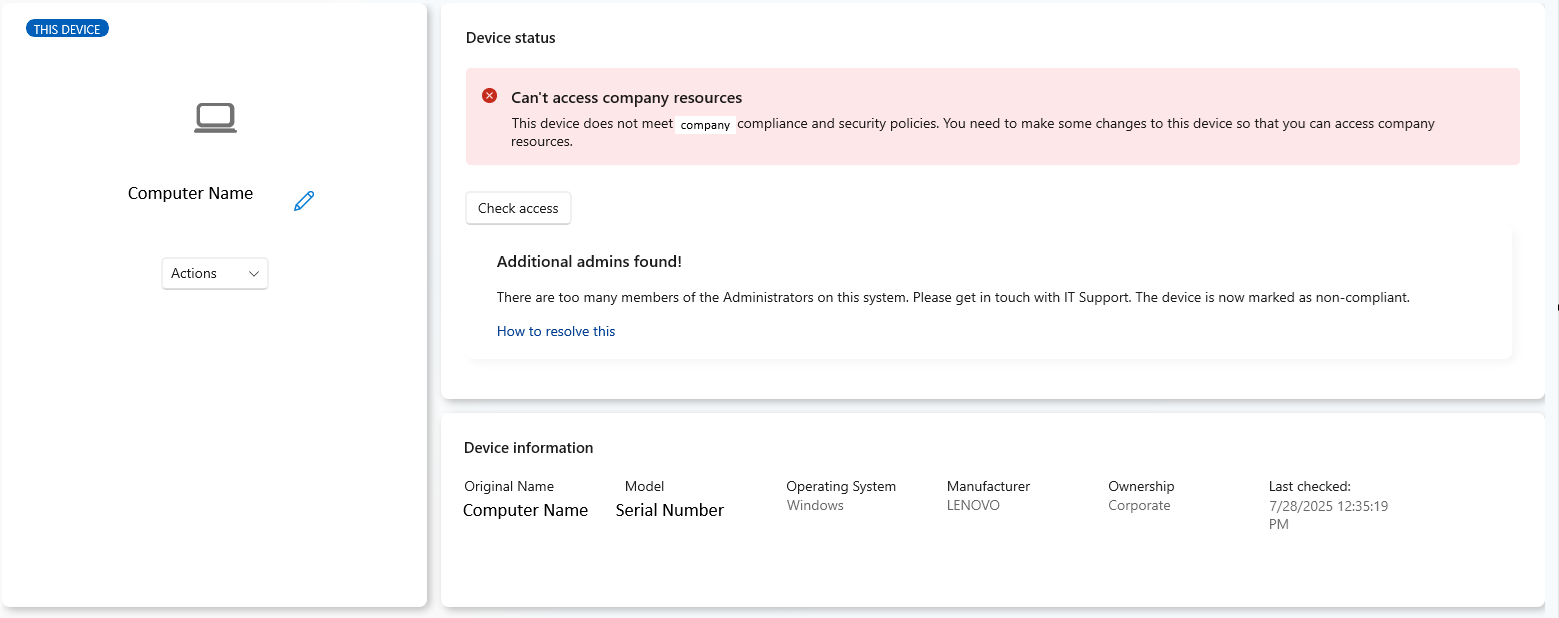
The end-result
As with all compliance policies, it might take some time for the Intune backend and the Intune Management Engine on the local device to pick up all the changes and sync all data. So if you don’t see a (correct) compliance status right away, give it some time. After that, you can see it in two different places.
Intune Portal
The Intune Portal will report on the device status of your new compliance policy, showing the devices and if they are compliant or not.

In my screenshot, I’ve obfuscated some of the information (such as parts of the username and the device names), but the information speaks for itself. Of course, you can also navigate to the device in Intune and see the compliance status for the individual device.
End User view
For the end user, the compliance status will be shown in the Company Portal. This will also show the reason for being non-compliant, which will be the text defined in the RemediationStrings in our admins.json file.
Options for remediation
So how do we remediate our non-compliancy? There’s no ‘auto remediation’ based on the compliance policy. Our script only outputs the actual number of admin accounts, but not the names or ID’s of those accounts. So it’s manual remediation: contact the end-user, take over the device and remove any accounts that shouldn’t be in the Administrators group.
Of course, you could use the base of this script in a remediation policy in Intune. By having the script exiting with the correct error-code when there are rogue admins, you can trigger a remediation script. With some slight re-work, you can use the information from our detection script as a basis for this remediation, deleting all additional admin accounts. You can find more info on these Proactive Remediations on Microsoft Learn.
The last option, that I found pretty handy, is to first collect some information. If you find more non-compliant devices, do a short inventory on what accounts are there. There’s a good change that they share the same local admin accounts, from some old policy or GPO that was once used. If you have that information, you can centrally remove those accounts using a configuration profile in Intune.
TL;DR
You can use custom compliance policies in Intune to detect any additional administrators and mark devices that have local admin accounts that are not allowed marked as non-compliant. An example detection script and the corresponding JSON-file can be found on my Github.